
MIDJOURNEY BASICS FOR PROFESSIONAL COMMUNICATORS
Are you looking to sprinkle some creative zest into your campaigns or maybe even add a visual pop to your next presentation? Look no further; Midjourney is your digital playground. Don't fret if you're not a tech wizard; we've got you covered. This guide is your golden ticket, walking you step-by-step through the wondrous world of Midjourney. You'll soon realize it’s not just for tech-savvy artists but also a game-changer for dynamic professionals like you. Ready to make some digital magic? Let’s dive in!
What is Midjourney?
Midjourney is an AI tool that turns written descriptions, known as "prompts," into visual art. You can whip up some pretty amazing pieces just by using simple Discord bot commands. Think of it as your favourite graphic design tool but on steroids. We're talking cutting-edge GPUs that work like a seasoned artist, crafting unique images for you exactly the way you want them.
Getting Started
Before you can use Midjourney, you need to set up a free Discord account; it’s a chat app similar in some ways to Slack.
Visit the Discord website to register a new account if you don't already have one.
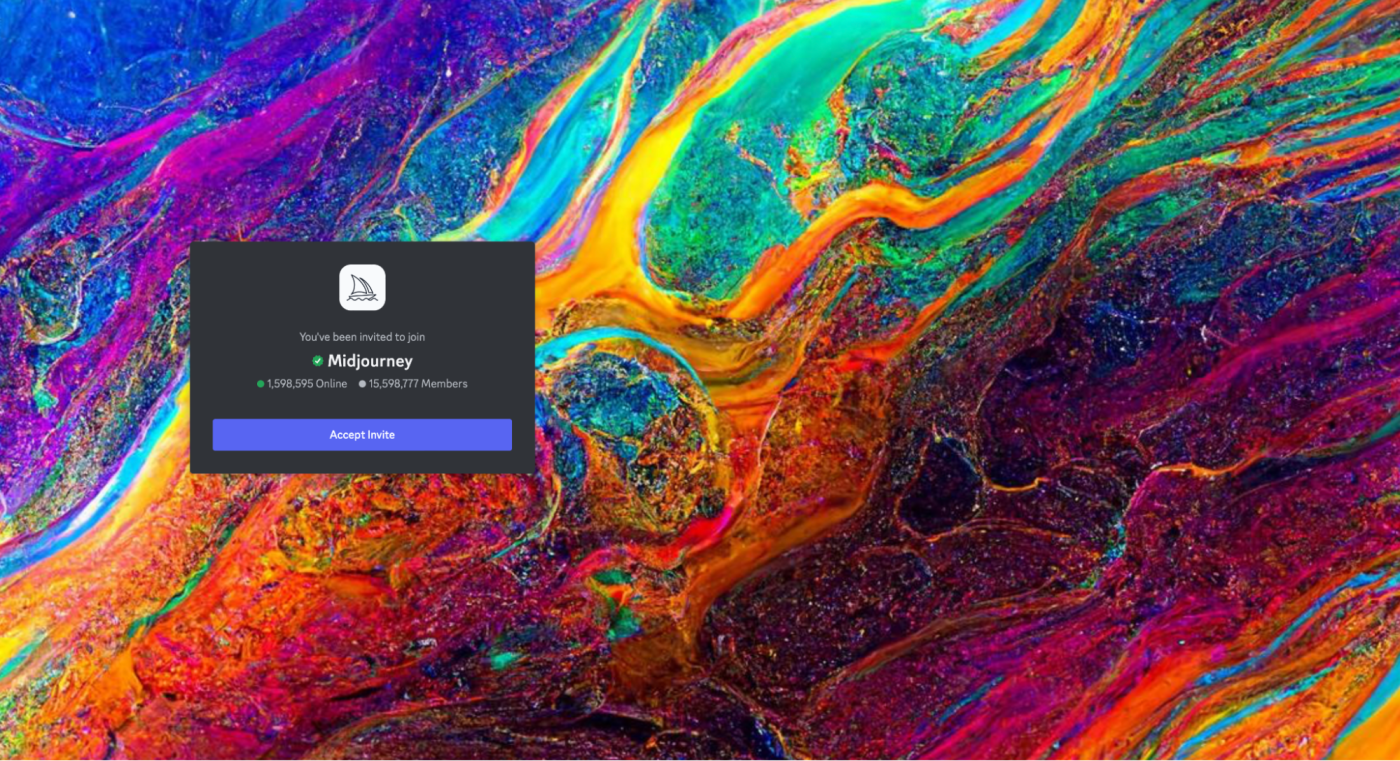
After your account is set up, head to the Midjourney website and click Join the Beta. This will open an invitation to join the Midjourney Discord channel.
Click accept Invite, and you're in.
Subscribe and Scope Out the Newbies Channel
Once you're in, click on a newbies channel on the left hand side - this is usually the go-to to start generating art in Midjourney's public channels.
Type
/subscribe. This will prompt you to choose a plan that fits your needs and budget.Once you’re subscribed, head back to Discord.

DM the Bot
Heads up - Midjourney is a community platform, and it’s a little chaotic and stressful. It’s a great place to get ideas and see what other people are up to, but if you want a more organized workspace, you can send commands to the Midjourney Discord bot via direct messages.
To start a Direct Message with the Bot, by clicking the little purple discord icon in the top left corner. Find “MIDJOURNEY BOT” in the direct message list and click it.
Just send any message to kick off your one-on-one convo with the Midjourney Bot. Simple as that!

Make Some Digital Magic
You interact with Discord bots like Midjourney using slash commands, kind of like the /subscribe you used above.
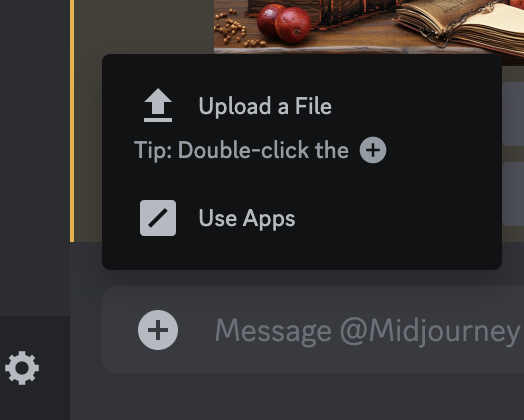
In the toolbar, click the “+” and hit “use apps,” and select the
/imaginecommand.
Write your first prompt using the instructions below, or try some of the sample prompts to unleash your creativity.
Use
/infoto keep tabs on your image generations.Once you hit enter, Midjourney will generate four images with “U” and “V” options underneath. Once you select the image you want, you will be given additional options (see below).

Tweak your Image

Prompt Basics
The general structure of a prompt is:
[image content/subject, description of action, state, and mood], [art form, style, and artist references], [additional settings, such as lighting, colors, and framing]
KEY TIPS
Be Specific: The more you spell out your vision, the better your results.
Don’t Over-Describe: Keep it focused; otherwise, you risk diluting the impact.
Experiment: Feel free to mess around with settings and parameters to get that perfect image.
Feel free to start with just the first section of image content, and move on when you’re ready!
IMAGE CONTENT
The first part of the prompt is what you’re looking to generate overall. Here, you can describe the who, what, where, when. Are you creating a picture of a dog? What is he doing? How are they feeling? What is the mood? What time of day is it? Be creative.
ART FORM
Next, choose an art form. What aesthetic are you going for? Here are some ideas:
-
Photography
Pencil Drawing
Annie Leibovitz Style
Sculpture
Charcoal Sketch
Cartoon
Poster Art
Illustration
Impressionism
Oil Painting
Pixar Animation
Abstract
Cubism
Watercolour
Digital Painting
Manga
Pop Art
Stencil Art
Pointillism
Graffiti
Renaissance
Surrealism
Collage
Geometric
Street Photography
Film Noir
Mosaic
Vexel Art
Hyperrealism
Vintage
Steam Punk
Conceptual
Photorealism
Minimalism
Textile Art
Still Life
Doodle Art
Chalk Art
Baroque
Mural
Fauvism
Pastel Sketch
Gothic
Pixel Art
Art Deco
Classical Portraiture
Scratchboard Art
Landscape
Silhouette
Linocut Printmaking
EXTRA DETAILS
Use any number of fun commands to make your image extra unique!
Lighting
Critical for setting the mood and aesthetics. Different lighting techniques can either enhance or diminish the subject's features.
-
Critical for setting the mood and aesthetics. Different lighting techniques can either enhance or diminish the subject's features.
Backlit: Illuminates the subject from behind.
Rim Light: Highlights the edges of the subject.
Fill Light: Softens or eliminates shadows.
Spotlight: Focuses light on a specific area or subject.
Natural Light: Uses sunlight or other natural light sources.
Fluorescent: Utilizes fluorescent light for a cooler tone.
Candlelight: Creates a warm, intimate setting.
Twilight: Captures the soft light between sunset and darkness.
Silhouette: Subjects are backlit with little to no detail.
Overexposed: Intentionally brightened for an ethereal effect.
Framing
Influences how the subject is positioned in the image to guide composition. Various framing techniques can dramatically change the viewer's perception of the scene.
-
Close-up: Focuses on a single subject to capture detail.
Long Shot: Includes a large portion of the scene.
Over-the-Shoulder: Shows the subject from behind another person's shoulder.
Aerial View: Captured from directly above the subject.
Low Angle: Shot from below, making the subject look larger.
High Angle: Shot from above, making the subject look smaller.
Fish-eye Lens: Distorts the scene for a dramatic, spherical effect.
Vignette: Softening or shading away the edges of the subject.
Centered: Places the subject in the middle of the frame.
Rule of Thirds: Aligns the subject along imaginary grid lines for balanced composition.
Level of Detail and Realism
Specifies how much detail is included and how realistic the scene appears. Higher levels of detail may require more resource.
-
Sketch: Simplified, less detail.
Cartoonish: Stylized, exaggerated features.
Grainy: Adds texture, mimics film grain.
Pixelated: Intentionally low-res.
High-Contrast: Bright highlights and dark shadows.
Matte Finish: Non-reflective surface.
Glossy: Shiny and reflective.
HDR: High Dynamic Range for more detail.
Soft Focus: Intentional blurring for a dreamy look.
Depth of Field: Focus on a specific distance range, blurring others.Framing
Influences how the subject is positioned in the image to guide composition.
Useful expressions include "wide shot," "point-of-view," and "dutch angle."
Colour Scheme
Helps control the colour of objects and the overall tone of the image. The choice of colour scheme can set the mood and influence emotional response.
-
Helps control the colour of objects and the overall tone of the image. The choice of colour scheme can set the mood and influence emotional response.
Monochrome: Single colour or shades of one colour.
Pastel: Soft, muted colours.
Warm Tones: Reds, yellows, and oranges.
Cool Tones: Blues, greens, and purples.
Sepia: Brownish tones for a vintage look.
Neon: Bright, electrifying colours.
Earth Tones: Browns, greens, and blues.
Complementary: Colours opposite on the colour wheel.
Analogous: Colours adjacent on the colour wheel.
Triadic: Three evenly spaced colours on the colour wheel.
Midjourney Parameters

An Easy Starting Point with /describe
Use an existing picture to get ideas for your own!
Head to a Creative Commons (like Unsplash) image site to find a picture close to what you're looking for.
Pop over to Midjourney and use their "/describe" feature. This lets you upload a photo and get some generated prompts.
Don't worry if the prompts seem odd, like "caffinol developing." You can use them as they are.
Spice up those prompts. For example, if the picture is of a woman at a laptop, add phrases like "at a cafe" or "dramatic scene."
Takes just a minute or two, and it's way more fun than scrolling through Pexels again.
Claim Your Masterpiece
Saving Your Art: is as easy as a right-click to save and add to your collection.
Sample Prompts to Try
A Note About Privacy & Security
Heads up - everyone can see what you're creating in the public channels.
Checking your settings with "/info" and typing "/private" in Discord makes your new art private in the Midjourney gallery, but it's still visible in public chat rooms BUT even if you go private, anyone who knows your Discord name can find your art on Discord.
You can help this by making a private room just for you and the Midjourney Bot on Discord.
First, create a new server on Discord. Then, find the Midjourney Bot in the public channel's member list.
Click "add to server" on the Bot's profile, choose your new server, and boom! You've got a private space to create art without anyone peeking.